How to install and configure Cacti on Linux
I had originally written this tutorial for xmodulo.com.
Any system admin working in a service provider network would certainly agree that Cacti is one of the most widely used tools in network management solutions. It is open source, has built in user authentications and user permission features, shipped with frequently used graph templates like bandwidth, 95th percentile, hard disk usage, CPU usage, load average, RAM statistics and many more. Cacti also supports 3rd party templates and plugins. If those are not enough, one can write and use one’s own templates, and that is the beauty of open source software.
Without further ado, let us jump in on how to deploy a Cacti server on Linux.
Install and Configure Cacti on Debian or Ubuntu
Before starting, we make sure that our server is in sync with the software repository.
root@server:~# apt-get update
Now we start installing Cacti.
root@server:~# apt-get install cacti
This step will install a lot of additional software (56 MB in my case) that are required to run Cacti. apt-get should be able to find and install the software automatically.
If MySQL had never been installed previously, we will need to set the new MySQL root password.

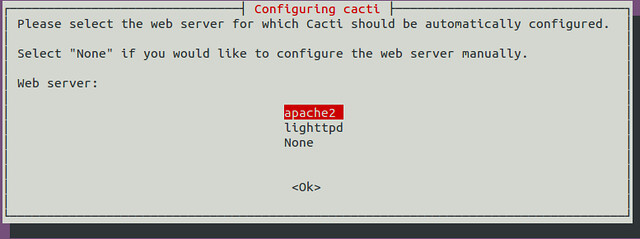
We have to specify the web server that is going to be used. In this case, we select the massively used Apache web server.
After that, we configure the Cacti database automatically using the dbconfig-common tool. Note that using this tool will remove any previously installed Cacti database(s), so please do not use it if previous data is needed.

As a part of this process, the root password for MySQL needs to be provided.

Next, the password for the new database user 'cacti' is specified. Cacti will use this password to interact with the MySQL database.

Install and Configure Cacti on CentOS or RHEL
For CentOS/RHEL, it is always recommended to use the software repository of Repoforge.org. Adding the Repoforge repository to the server is not hard at all.
Now that we are ready to use the repository of Repoforge, we will be able to install Cacti without any trouble.
[root@server ~]# yum install freetype-devel libpng-devel libart_lgpl-devel php-gd mysql-server mysql php-mysql php-pear php-common php-gd php-devel php php-mbstring php-cli php-snmp php-pear-Net-SMTP php-mysql httpd net-snmp-utils php-snmp net-snmp-libs crontabs cacti
That is a long list of packages, but I have learnt it the hard way to specify all of them to make everything work seamlessly.
The next step is MySQL configuration. We have to create necessary database and database user for Cacti manually. A script provided with Cacti will be responsible for creating necessary tables. I am assuming that MySQL had never been installed in the server.
The root password for my MySQL server is NEWPASSWORD. Needless to say, your password should be something strong, especially if the server is going to be in a production environment.
[root@server ~]# service mysqld start
# We make sure that the service mysqld is added into startup
[root@server ~]# chkconfig mysqld on
# We define the root password for the server
[root@server ~]# mysqladmin -u root password NEWPASSWORD
# We create a database named cacti
[root@server ~]# mysql -u root -p -e 'create database cacti'
# We make sure that the service mysqld is added into startup
[root@server ~]# chkconfig mysqld on
# We define the root password for the server
[root@server ~]# mysqladmin -u root password NEWPASSWORD
# We create a database named cacti
[root@server ~]# mysql -u root -p -e 'create database cacti'
Now that the database is created, we move forward towards creating the database user 'cacti' with password 'cactipw' and setting up necessary permissions.
[root@server ~]# mysql -u root –p
# Input the mysql root password here
# Creating database user cacti and setting necessary permissions
mysql> GRANT ALL ON cacti.* TO cacti@localhost;
mysql> set password for cacti@localhost=password("cactipw");
mysql> FLUSH privileges;
mysql> \q
# Creating the required tables using the script cacti.sql
[root@server ~]# mysql -u cacti -p cacti < /var/www/cacti/cacti.sql
#enter the password for the cacti user here
Next, it's time to tune the web server. Cacti default web server configuration allows only the local server to access Cacti page. To make the page viewable to everyone, we need to modify the following configuration file.
Good Practice: It is always recommended to back up any configuration file before modifying it.
[root@server ~]# vim /etc/httpd/conf.d/cacti.conf
# We replace ‘deny from all’ with ‘allow from all’
#deny from all
allow from all
# We replace ‘deny from all’ with ‘allow from all’
#deny from all
allow from all
We need to create a soft link to adjust the directory of cacti as well.
[root@server ~]# ln -s /var/www/cacti /var/www/html/cacti
Optionally, update the timezone in PHP. If the timezone of the server is not configured properly, Cacti log can contain records on errors caused by that. Just to be safe, I usually modify the timezone in my php.ini file. This step is optional though, and Cacti will function even if this modification is not carried out. I have adjusted the configuration for Asia/Dhaka.
Good Practice: It is always recommended to backup any configuration file before modifying it.
[root@server ~]# vim /etc/php.ini
# We modify the timezone
date.timezone = Asia/Dhaka
Go ahead and restart the httpd service and make sure that it is added into startup.
[root@server ~]# service httpd restart
[root@server ~]# chkconfig httpd on
[root@server ~]# chkconfig httpd on
Lastly, it is time for some final tweaking for Cacti. We have to specify the Cacti database user password that was set earlier i.e. 'cactipw' in the Cacti configuration file.
Good Practice: It is always recommended to back up any configuration file before modifying it.
[root@server ~]# vim /var/www/cacti/include/config.php
# We specify the cacti database username and password
$database_username = "cacti";
$database_password = "cactipw";
If crontabs had never been installed previously, it is advisable to start the service.
[root@server ~]# service crond restart
[root@server ~]# chkconfig crond on
[root@server ~]# chkconfig crond on
The crond service should run the Cacti poller periodically, typically every 5 minutes. But if we want, we could run the poller for the first time manually using the following command.
[root@server ~]# php /var/www/cacti/poller.php
Finally, Cacti has been successfully deployed in the server. It was a long process, but if you could do it step by step, it shouldn't be that hard. Divide and conquer, mate...one at a time.
Comments
Post a Comment